
In this tutorial, we are going to creating a CentOS 7 base image for our Atlassian applications.
In our cases, the base image is will be created on an ESXi based virtual machine. If you are using other hypervisor or running on a bare-metal you can also follow this tutorial.
If you are using a cloud provider such as AWS, Google Cloud, DigitalOcean, the base image we are creating is very similar to their image.
Creating a Virtual Machine
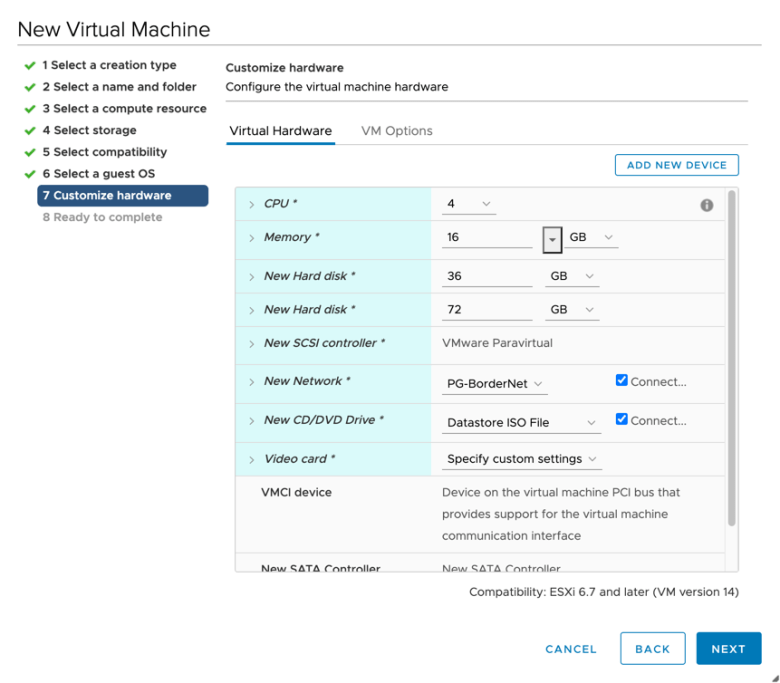
I am creating a medium size VM with 4 Core and 16G RAM here. You may adjust the size of the VM based on your workloads.
Here’s my checklist
| CPU | 4 Core | for most light load application |
|---|---|---|
| RAM | 16 GB | for most median load application |
| HDD1 | 36 GB | /dev/sda for system installation |
| HDD2 | 72 GB | /dev/sdb for application |
| NIC | 1 | Local and Internet connection |
| Optical Drive | 1 | Mount CentOS Installation ISO |
Install CentOS 7
Boot up the virtual machine you just created. Make sure CentOS installation ISO is mounted.
In most cases, you will boot automatically from the optical drive. Otherwise, you need to check the boot option.
Select Install CentOS 7.
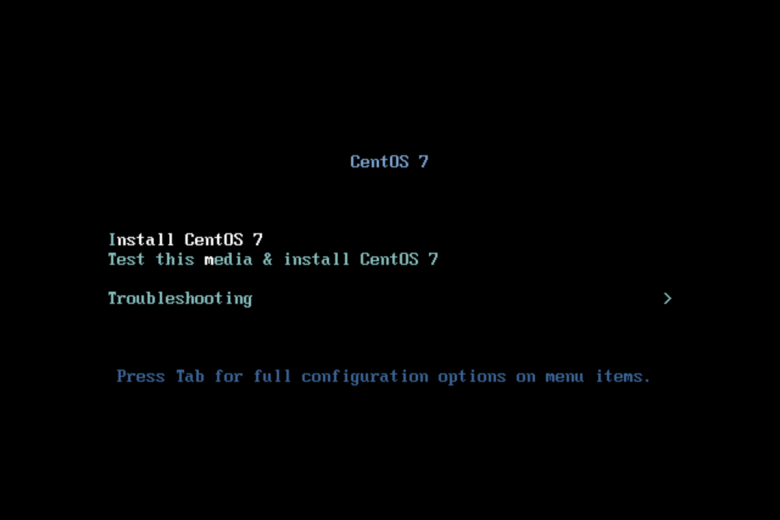
Start Installation

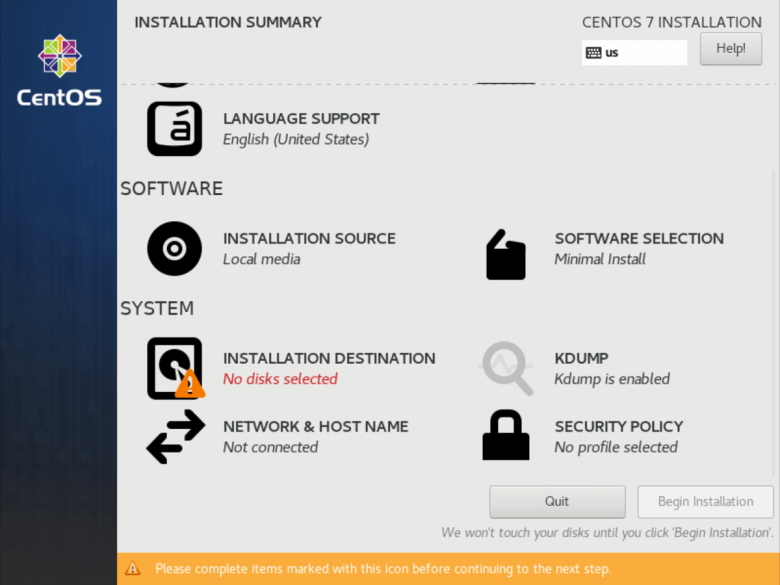
In Installation Summary, it’s better to start from bottom to top, because NTP client in Date and Time requite a network connection. I will configure the server in the following order:
- Network and Host Name
- Installation Destination
- Software Selection
- Date and Time
Configure Network for Installation
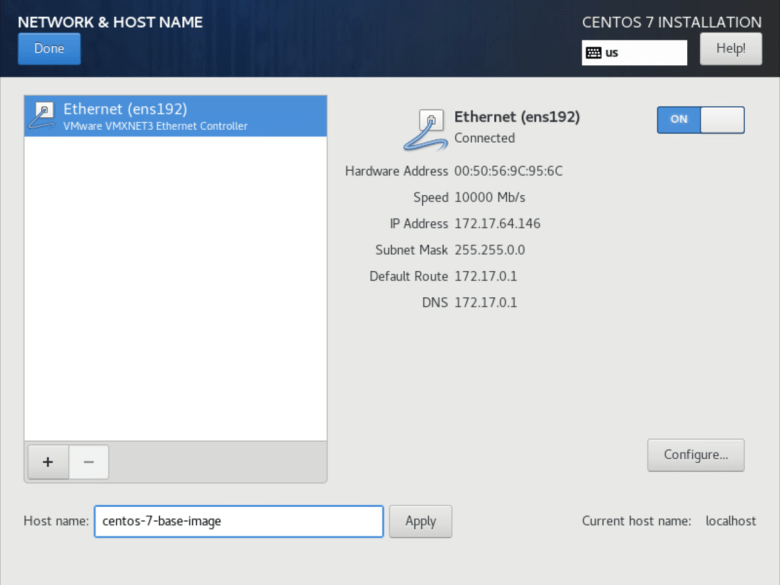
Open Network & Host Name in Installation Summary.
Enable network interface (ens192 in our setup), if there is a DHCP server in your network, the system will get network configuration automatically, otherwise, you need to click Configure and fill in network information such as IP address, default route and DNS.
Then give the server a hostname, it can be an FQDN or a simple name such as centos-7-base-image.
Setup Drive and Partition
After network setup, we have to configure our local drive for system installation.
Linux partition can be a little bit complex than installing a Windows, but this is out best practices
Choose Right Disk Size
From the checklist, I create two drive for this VM, a 36 GB disk on iSCSI 0:1 as sda and 72 GB disk on iSCSI 0:2 as sdb.
We are going to install CentOS on the first small drive and leave the large drive to applications. Compare to Windows, Linux usually uses less storage space. A 30 GB drive is generally enough for a server boot drive even with GUI installed.
Install OS and Application in Different Drive
Although this may use slightly more disk space, it is one best practice to separate your OS and your application data. In the situation of OS fails, such as a misconfiguration or fail OS upgrade, you can easily mount your application drive to a new OS image and start your application with minimal reconfiguration. Because in most cases fix an OS issue is a time-consuming task.
Use Logical Volume Manager (LVM)
It strongly recommends uses LVM in your setup.
Logical Volume Manager (LVM) providing more advance feature such as snapshot, caching, software-based RAID, but this is NOT the reason we use LVM. I personally against using those LVM features because in a typical enterprise environment your storage system and hypervisor should providing much better and reliable caching, RAID and snapshot functionally. The reason we use LVM is we can increase our volume size by adding more standard size drive and perform online resize without repartition or shutdown application.
So we start to configure our OS drive with LVM:
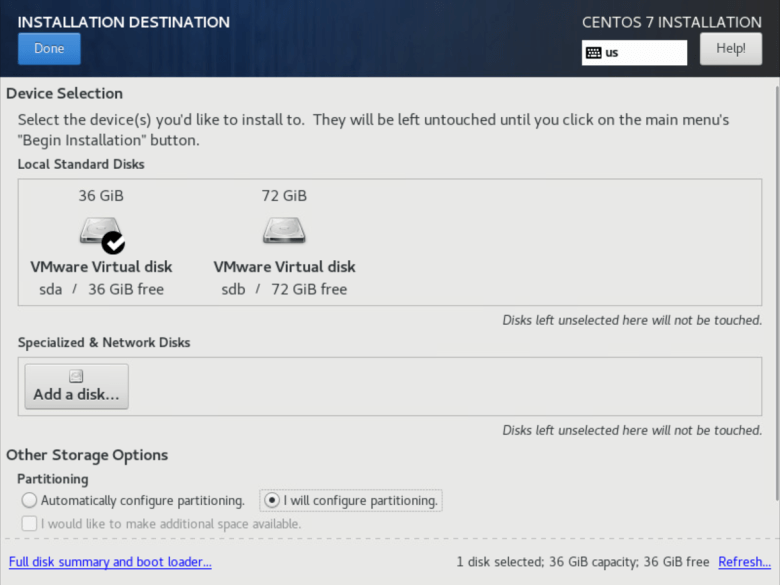
Open Installation Destination in Installation Summary.
Select the first drive sda and choose I will configure partitioning, then click Done.
In Manual Partitioning, select LVM and let CentOS installer create volume by Click here to create them automatically.
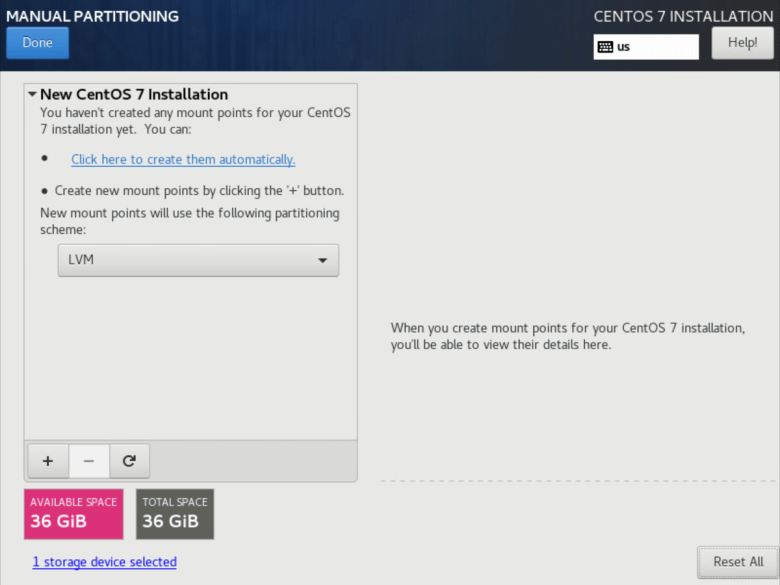
Then the installer will automatically create a plan for your system based on your RAM size.
The automatic partition plan is good enough for general purpose, you can click Done to use the plan.
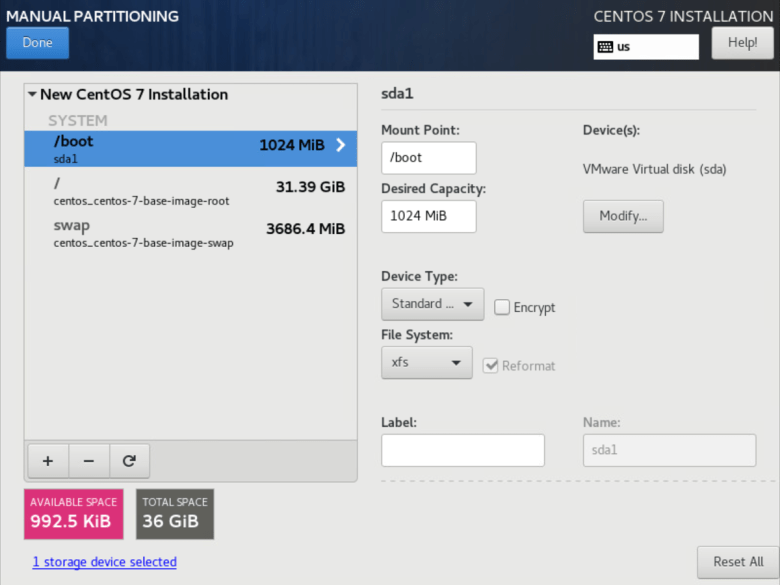
I would like to make small changes to standardise the drive across all my server. So I will check all volume created by the installer.
The first is the /boot drive, it is recommended to have 1 GB on /boot for Linux kernel. So we do not make any changes to this volume.
When performing a Linux kernel upgrade, it is better to have more disk space to store a backup kernel and your new kernel so we can have better chance to survive a fail kernel upgrade (e.g new kernel may not working with your hardware or driver) and be able to roll back to the backup kernel. Otherwise, you deferentially need rescue DVD to boot up your system.
You may also want to change the file system from xfs to ext4 for more compatibility in the enterprise environment.
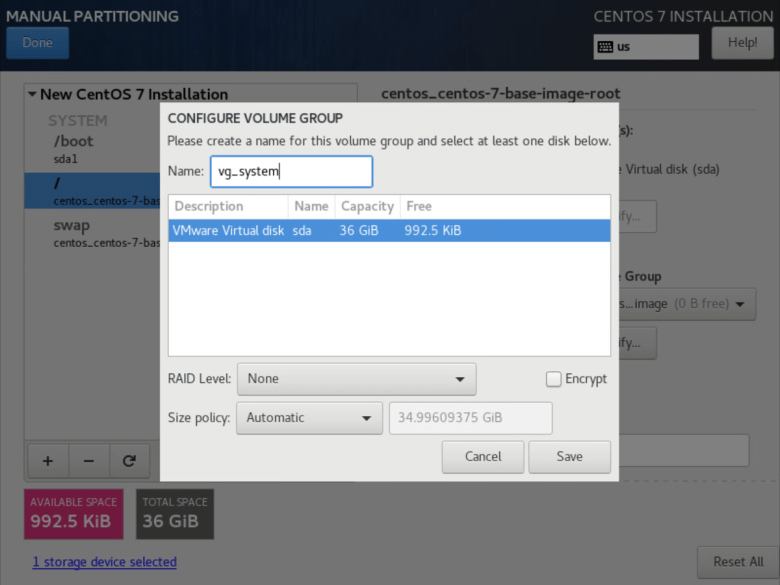
Next select root volume “/”.
The default volume group name will be your hostname, I usually change the OS volume group to “vg_system”. You can do this by click Modify.
Then change the logic volume to lv_root.
I prefer to assign volume group name with prefix “vg_”, such as vg_system, vg_data; and logical volume name then prefixes “lv_” such as lv_root, lv_opt, lv_data. Because when you make changes on your LVM in shell, those prefix will help you identify which resource you are operating on, so you do not make the mistake of mixing volume group named data with the logical volume named also data.
I also reduce the volume size to 30 GB, so I can have 1 or a few GB left.
I do this because it provides a buffer and buys you some time when your drive is full. In a situation when your drive is 100% full and causing issues, I can quickly add those few GB to those volume group and logic volume with few commands within less than 30 seconds. Then you probably have a few minutes buffer time to plan what you can do next. It’s much faster than delete any non-useful files or adding drive from ESXi or Cloud Management Dashboard.
You may also want to change the file system from xfs to ext4 for more compatibility in the enterprise environment.
Next select swap volume.
Swap size is another controversial topic. People usually say you should have 1.5 x RAM space when you have smaller RAM size, for example, 4 GB ram with 6 GB swap; and 0.5 x RAM size with you have a large RAM size, for example, 64 GB ram with 32 GB swap size. This rule may use when you are configuring a Linux as a workstation but it’s completely different in a server configuration.
In a production environment, if your software not specifically require a certain size of the swap, you can leave a maximum of 4 GB of swap space, 2 GB or even 1 GB is recommended. Because in a production environment a slow software with swapping but alive is much WORSE than an out of memory kill (OOM Kill). A slow software in most cases will cause chain relation and cause other software to slow down, and finally may cause the whole system to slow down, there will impact all of your users, and that is why there is circuit breaker design pattern in software engineering.
Besides, many RAM intensive software requires little or even no swap, such as Elasticsearch or Kubernetes. Swap in a production environment now is more providing compatibility rather than any actual usefulness, as some leniency software can not run with no swap configured. So a very small size swap is enough for your system, and they should not be used at any time.
In a smaller size non-production environment, such as development server, you may want to have no more than 8 GB configured, and 4 GB to 8 GB is generally a sweet spot, anything with more than 8 GB swap means you need to consider increasing your memory size.
Here we rename the swap volume to lv_swap and set the size to 4 GB or 4096 MB.

Then select Done, and Accept Changes.

Select Software Package
Then Software Selection in Installation Summary.
For application server, Minimal Install is well suitable in most situations.
If your installation media is a latest version, you may want to choose Development Tools and System Administration Tools. otherwise, it’s better to install with an online yum repository.

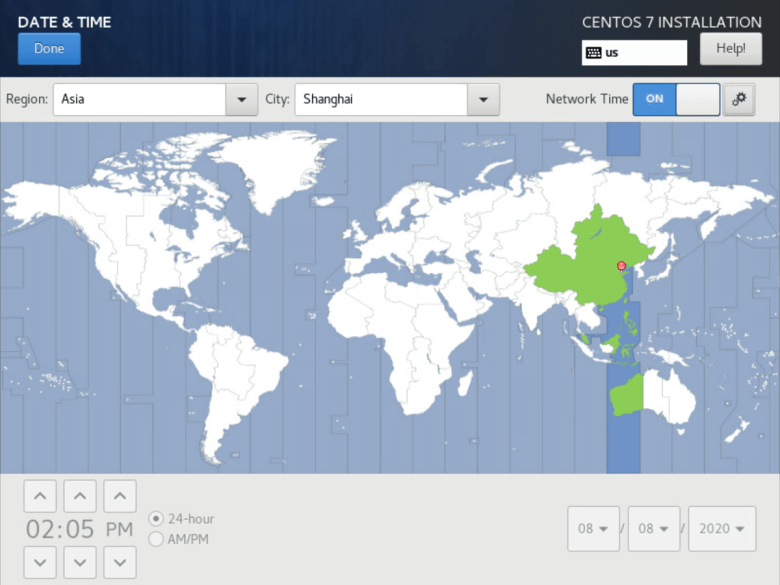
Setup Date and Time
Finally, click Date & Time in Installation Summary.
Enable Network Time to start NTP client, and then select your timezone.
Start Installation
After verifying your configuration, click Begin Installation to start installation process.

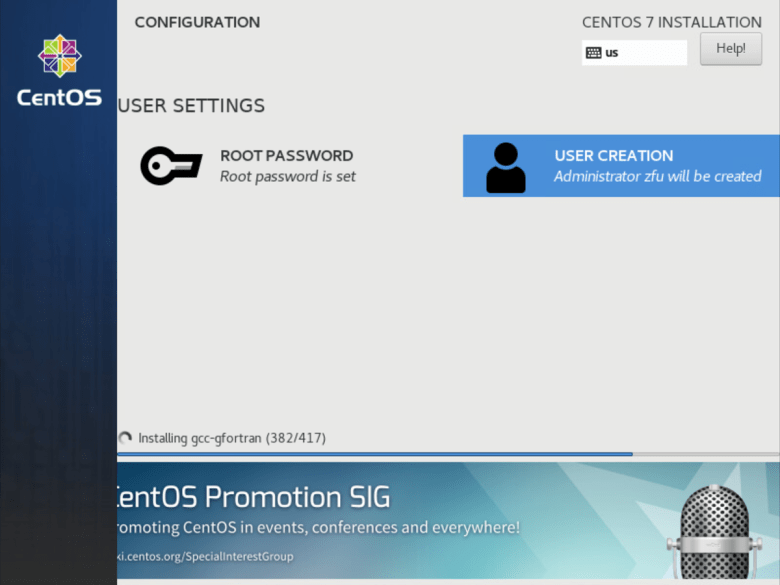
During the installation process, you can set up your root password and a user account.
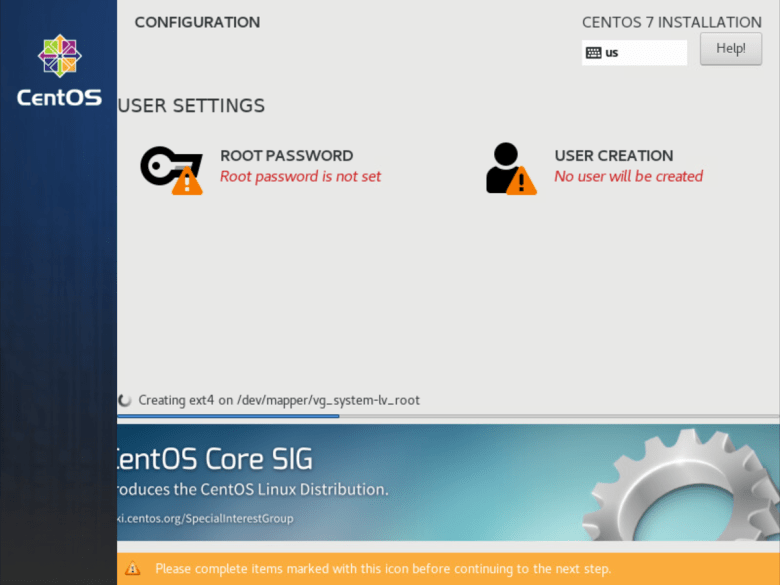
It’s better to choose a strong password for root.

You can also create a user or administrator user.

Then wait for the installation complete, for minimal installation it should not take long.
Finally, remote the installation media and click Reboot to reboot the system.

After Installation
After installation, you can log in with your user account and password during the installation process.
And now you have a base image for your application.

